Going Camping in the Winter? Some Safety Rules of Winter Camping

Safety Rules of Winter Camping

1. Do not go winter camping unless you have adequate equipment and provisions and are in good physical condition. You and your gear need to be ready for this difficult form of camping.

2. Never light a fire inside a tent unless the tent has been specifically designed for fire and you know for sure that it is designed for fire. Most tents are not designed for this purpose, though some, like a tepee are.

3. Do not go winter camping alone. Instead, use the buddy system. Frequently check your buddy for signs of frostbite and hypothermia.

4. Don’t arrive after dark. Allow plenty of time to set up camp before it gets dark, especially if you plan to build a snow shelter on site. Setting up tents in the snow is a little tougher.

5. Check the weather forecast and what the current conditions are first. Remember the weather can get worse.

6. Always keep a responsible someone outside your group aware of your itinerary including where you are going and by what route and when you are coming back. Than stick to your plans or update your contact with the new information. If something goes wrong a search party needs to know where to look. How tragic if something bad happens and the search party is looking in the wrong place for you?

7. Get a permit when camping in the back country and register with the ranger.

8. Wear a brightly colored outer layer so that you can be easily seen by other members of your party. Winter camping is not the time to blend into your surroundings. This becomes even more essential if a snow storm blows in.

9. Do not overestimate the capabilities of your group. Be realistic and practical.

10. Do not underestimate the dangers of winter conditions. Be safe!

11. Use common sense at all times.

wintercamping

Posted in Camping & RVing | Comments Off on Going Camping in the Winter? Some Safety Rules of Winter Camping

Steps to Take if Stranded in Winter

If you ever find yourself stranded in winter conditions without a way to get out, here are some important things to keep in mind.

1. Shelter is the #1 priority. Without a proper shelter you are subject to hypothermia or worse.

If you have a car, stay with it if safe to do so as it provides decent shelter. Cars are also fairly easy for rescuers to find. However a building/cabin is even better, especially if you can heat it up. If the vehicle gets buried in snow, do not run the engine, as this can force deadly carbon monoxide inside. It is better to shut off the engine and keep the doors and windows closed than to go outside and dig the car out. If the car gets buried in snow, it will add a layer of insulation and keep the inside warmer.

Next best shelter is a cave because larger caves have fairly consistent temperatures and provide good protection from the elements.

The next best idea is to build a snow cave. These can be surprisingly warm because they hold your own heat in. Here is an example of a little snow cave a guy built in his front yard.

If you can’t build a snow cave than try to build any other kind of temporary shelter that you can from available materials.

Once you have shelter figured out, try to get a fire going. Don’t eat snow directly – try to melt it first. This will help prevent you from chilling your insides.

Than wait for rescue. If you protect yourself with shelter and warm yourself with fire your chances of being found alive are quite good.

Posted in Emergencies | Tagged , | Comments Off on Steps to Take if Stranded in Winter

Two Methods of Judging the Height of a Tree and the Width of a Stream

The main reason for wishing to estimate the height of a tree and the width of a stream would be so that you could cut down a tree and use it as a bridge to cross the stream. Of course, a responsible outdoors person would never do this without permission from the landowner, and even then, only after careful consideration. How unfortunate for you though, if you cut down a tree that was not tall enough to span the stream, and what a waste of a good tree if it were too long!

Height Estimation, Method 1

In the first method presented here, you will need a ruler, or any object with evenly spaced markings on it. Walk up to the tree, and estimate a point on it that is a mathematically convenient height from the ground (say five feet, or two meters). Mark that spot so that you can see it clearly from a distance by tying a rope around the tree at that height.
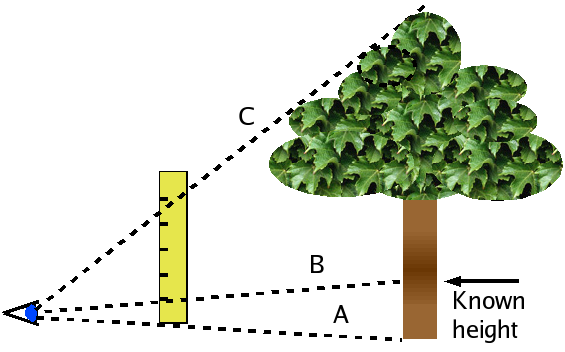
Next, walk away from the tree so that you can see its top. Hold the ruler in front of your face, such that the line of sight from your eye to the base of the tree crosses the “0” mark on the ruler. This is line A in the diagram. Then move the ruler either towards or away from your eye until the line from your eye to the rope you tied to the tree crosses the “1” mark on the ruler. This is line B in the diagram. When the ruler is positioned correctly such that lines A and B point to the base and the known height, glance up and note the measurement where the line from your eye to the top of the tree (line C in the diagram) crosses the ruler. Do this without moving the ruler or your head. When you have this measurement, multiply it by the mathematically convenient height you selected in the beginning. This is the height of the tree.

For instance, suppose you selected 2 meters as the known height on the tree, and line C crossed the 4.5 mark on the ruler:

Estimating height.png

Height Estimation, Method 2

In the second method for estimating height presented here, you will need a sheet of paper. Fold the paper so that the left edge meets the bottom edge, forming a 45° angle. Sight along the bottom of the paper so that line A in the diagram points to the base of the tree. Then move closer to or farther from the tree until the line through the fold points to the top of the tree (line B in the diagram).
Be careful to not poke yourself in the eye with the corner of the paper. In fact, it would be prudent to cut off the corner. The angle will still be correct even without it.
When the bottom of the paper points to the bottom of the tree, and the fold in the paper points to the treetop, the distance between you and the tree equals the height of the tree. Estimate this distance by pacing it off. Every two steps is roughly 5 feet, or if you prefer metric, every step is roughly 75 cm (which means every fourth step is about 3 meters). For more precision, measure your stride and use that figure.

Estimating height.png

Width Estimation, Method 1

The first method we present here for estimating the width of a stream will involve choosing an easily seen marker on the opposite side, and designating is “Marker A”. Place a second marker (B) directly across the stream from marker A, and the place two more markers (C & D) along the stream bank at equal intervals. That is, be sure that the distance from B to C equals the distance from C to D. Also, try to form a 90° angle from A to B to C. Walk away from the stream at 90° from line B-D until you can see that markers A and C line up. Mark the place where this happens with marker E. If your 90° angles are accurate and the distance from B-C and C-D are equal, the distance between E-D will equal the distance between A-B (which is the width of the stream).

Estimating width.png

Width Estimation, Method 2

Method 2 for estimating the width of a stream is exactly the same as method 2 for estimating the height of a tree, except that the paper is held horizontally instead of vertically. Find a marker on the opposite side of the stream to serve as the “treetop” (this could be a rock or a tree), and mark a spot on your side of the stream bank directly across from the marker on the other side. Walk along the stream bank as you sight along the bottom edge of the folded paper to the mark on your side, and sight along the folded edge to the marker on the opposite side. Move away from the marker until both line up. Then pace off the distance between you and the marker on your side. This will be equal to the distance across the stream.

Source

Posted in Camping & RVing | Tagged , , , | Comments Off on Two Methods of Judging the Height of a Tree and the Width of a Stream

How to Purify Water when Camping

Water is essential to our survival, but dirty water can kill us.  When you go out camping you need to ensure you have the means to access fresh clean bug free water. If you are exercising outdoors (hiking or other outdoor activities) the absolute minimum intake is two liters per day. It is far better to drink one liter per hour, especially if it is hot, or if the hiking is strenuous. Do not rely on thirst to tell you to drink – when you are thirsty you are already getting dehydrated.

Signs that water is contaminated include the following:

  1. Nothing living in the water: If you cannot find any signs of life in the water, it is very likely to be unfit for drinking. If plants and animals cannot live in the water, it may contain poisonous chemicals.
  2. Oil film on surface: Runoff from roadways can deposit petroleum-based oil in the water. If you see a rainbow slick on the surface, this is a sign of pollution.
  3. Foul Odor: Foul smelling water is sure to be foul tasting as well, but the damage caused by drinking it may well extend beyond the taste buds.

There are basically five ways to purify water for drinking and two natural sources of pure water. Each has its advantages and disadvantages.

Boiling: Water can be purified by boiling for five to ten minutes. Be sure it really boils though.

Iodine: Iodine is added to water as a solution, crystallized, or in tablets. The iodine kills many — but not all — of the most common pathogens present in natural fresh water sources. Carrying iodine for water purification is an imperfect but light weight solution for those in need of field purification of drinking water. There are kits available in camping stores or on Amazon that include an iodine pill and a second pill that will remove the iodine taste from the water after it has been disinfected.

Chlorine: Chlorine-based bleach may be used for emergency disinfection. Add 2 drops of 5% bleach per liter or quart of clear water, then let stand covered for 30 to 60 minutes. After this it may be left open to reduce the chlorine smell and taste.

Filtering: Water filters are also used to make water potable. These filters are usually small, portable and light (1-2 pounds), and filter water by working a hand pump. Dirty water is pumped via a tube through the filter, then out into another flexible tube and directly into a water bottle. These types of filters work to remove bacteria, protozoa and cysts, all of which can cause disease. These water filters should not be confused with devices or tablets that are water purifiers.

Water purifiers: Water purifiers satisfy higher EPA standards, and also remove viruses, such as hepatitis A and rota virus, among others.

Water from Snow: You can collect pure water from clean snow if available. Collect a pot full of snow and heat. You will want to add a little water to the pot or you can burn an aluminum pot with the air pockets in the snow.

Collect Rainwater: Use a tarp, bucket or other method to catch and collect rainwater that does not require purification.

Collect Dew: In the morning when the dew is still on the grass (or rain) wrap your legs in a clean t-shirt or dishcloth and go for a walk in the grass. You can wring clean water from the cloth and go get more.

Solar still: A solar still can be used to extract pure water from just about anything that is wet. Start by digging a hole 25cm deep. Place a small container in the center of the hole – this will catch the water. Place damp matter (chopped up cacti, wet leaves, etc.) in the hole around the container, and then cover the hole with a transparent plastic sheet. Weight down the edges of the plastic sheet so that it cannot slip into the hole, and place a small weight (such as a small rock) in the center of the sheet. This weight should be situated directly over the center of the container. As sunlight penetrates the sheet, it evaporates the water from the damp material in the hole. The water vapor rises until it reaches the sheet, where it condenses. As the water collects on the underside of the sheet, it runs downhill to the weight where it drips off, and hopefully, falls into the container. This will even work with urine (but reserve that for a real emergency). This is perhaps the toughest way to find fresh water but it can work in the desert and other difficult situations where water is scarce.

Selected Plants: Some plants contain usable water. Learn which ones can be a source of water in your area if you plan to spend a lot of time in the wilderness.

Posted in Camping & RVing | Tagged , , | Comments Off on How to Purify Water when Camping